4.3 Calibration Quantities
The following sections give information on:
Spectral Precision
Spectral calibration is usually performed using atomic intrinsic lamps e. g. Hq, Ne, Ar and Kr lamps. The wavelengths of these emission lines are perfectly known from atomic physics theory and can be used to calibrate spectral measurement devices such as array spectrometers or monochromators.
Spectral Irradiance
Irradiance (W/m2) measured as a function of wavelength (nm) is known as spectral irradiance. This type of source calibration is performed using a spectral measurement device or spectroradiometer in comparison with a reference standard. The spectral range of the calibration depends on the source and spectral range of interest. A typical QH lamp can be spectrally scanned from 200 nm to 2500 nm using a fixed wavelength increment or variable bandwidth depending on the required resolution.
Spectral Radiance
Radiance (W/cm2 sr) measured as function of wavelength is called spectral radiance. Radiance in a given direction, at a given point of a real or imaginary surface is the optical unit used to calibrate optical radiation sources. Calibration is normally performed using a spectral measurement system or spectroradiometer equipped with a radiance lens assembly that has been calibrated using an integrating sphere-based radiance standard. The spectral range of the calibration depends on the source and spectral range of interest. A full spectral scan may cover wavelengths ranging from 350 nm to 2500 nm.
Spectral Responsivity
The sensitivity of optical radiation detectors, photodetectors and photodiodes changes depending on the wavelength. This spectral responsivity can be measured as a relative responsivity (as a percentage) across the active wavelength bandpass of the photo-device. For example, a silicon device scan could cover the wavelength range from 250 nm to 1100 nm at a set increment whereas a GaAsP photodiode covers a range between 250 nm to 700 nm. The increment setting could span from 1 nm to 50 nm depending on the required resolution. In some cases, the single point response at a particular wavelength may be all that’s required for some applications. Calibrations are performed by transfer comparison and certified against qualified reference standards.

Fig. 1: InGaAs Detector with sphere. Relative spectral response plot
Illuminance Sensitivity
Calibration of the illuminance response of photopic detectors is normally performed as a transfer comparison with a photopic reference standard. The photometric responsivity of the reference standard can be qualified through radiometric measurement using red, blue and green filtered photodetectors. However, this is a complicated procedure that is often left to advanced radiometry laboratories. Illuminance sensitivity calibrations allow for direct reading of the photopically corrected detector in lux or footcandles. Most illuminance calibrations are mostly done using a tungsten source. If the photopic detector’s spectral response does not match the CIE photopic curve to a certain high degree, errors will occur when performing measurements on different types of sources.
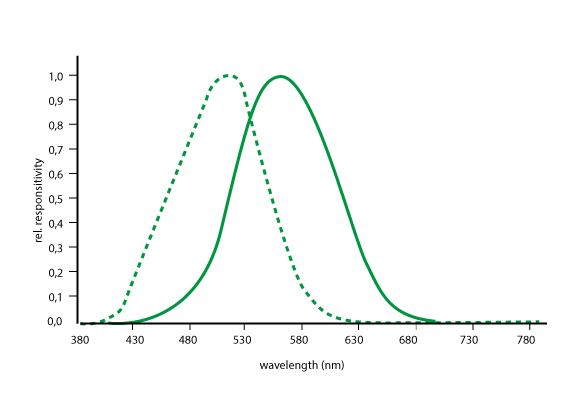
Fig. 2: CIE scotopic and photopic function
Luminance Sensitivity
Luminance responsivity of photopic detectors equipped with field limiting input optics is achieved through comparison with a luminance reference standard detector. A uniform luminance field of is produced using a calibration source that has an integrating sphere or a source with an optically diffuse material. The luminance detector’s field of view is confined to a narrow angle so that the detection area is overfilled with a sample of the uniform luminance field. Luminance detectors are calibrated for measurements in the optical units of candela per square meter and foot-lamberts.
Color Sensitivity
Broadband colorimetric detectors are calibrated through comparison with reference standards based on CIE tristimulus values using a light source of known color temperature. Color temperature, luminance and illuminance calibrations may be included depending on the color meters capability. The color meter is calibrated to display the color chromaticity coordinates (x, y and / or u', v') of the light source under test.
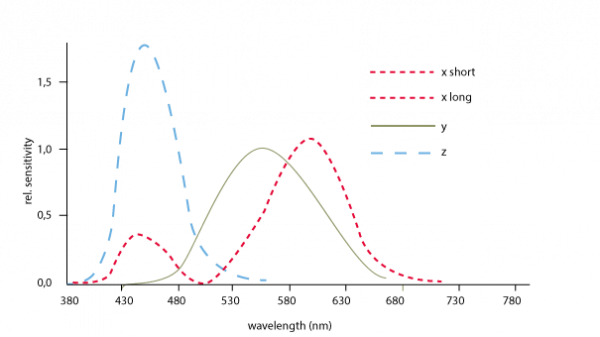
Fig. 3: Color detector tristimulus functions
Irradiance Sensitivity
Broadband irradiance detector calibrations are performed through transfer comparison with reference standards in respect to the spectral characteristics of the detector to be tested. Reference detectors are calibrated against spectral irradiance measurements using a double monochromator spectroradiometer, which has been calibrated using traceable spectral irradiance standards. Irradiance detectors are calibrated to display measurement values in the optical units of watts per square meter or watts per square centimeter over a specific wavelength range.
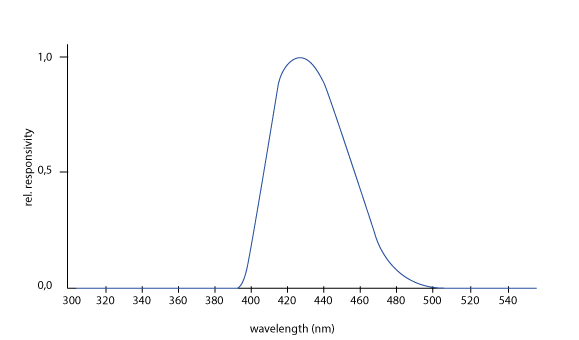
Fig. 4: Blue spectral response irradiance detector
Spectral Reflectance
Calibration of the spectral reflectance of materials is accomplished through comparison with reference reflectance standards that are used in the calibration of the spectrophotometric instrument used to perform the measurement. Single or double beam spectrophotometers can have a spectral range between 250 nm and 2500 nm with adjustable wavelength increments. When coupled to an integrating sphere, the spectrophotometer can be used to separately measure the total hemispherical, diffuse and specular reflectance. Without the sphere, the inline spectrophotometer setup only measure the normal specular reflectance component.
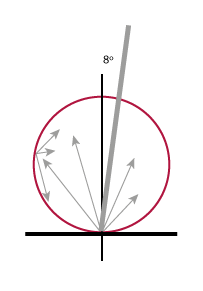
Fig. 5: 8 Degree reflectance measurement setup
Spectral Transmittance
Calibration of the spectral transmittance of materials is done through comparison with reference transmission standards that are used in the calibration of the spectrophotometric instrument used to perform the measurement. Single or double beam spectrophotometers can have a spectral range between 250 nm and 2500 nm with adjustable wavelength increments. When coupled to an integrating sphere, the spectrophotometer can be used to separately measure the total hemispherical, diffuse and regular (specular) transmittance. Without the sphere, the in-line spectrophotometer setup only measures the regular reflectance component. Calibration is performed as a percentage transmission against the wavelength.
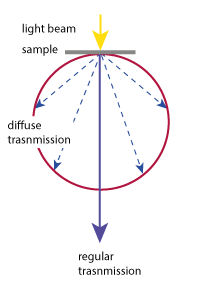
Fig. 6: Transmission measurement setup